Thursday, January 27, 2011

Red Velvet Swirled Cupcakes


This little twist on red velvet cupcakes will make a great Valentine's Day treat. But it's also going to make a great treat today, because I'm not waiting 3 weeks. Crazy?


I don't have much to say about this recipe other than it's good, it's pretty, and I'm rushing this post to go get one now...

Recipe (Baking Bites)

Ingredients:
1 1/3 cups all-purpose flour
1/2 tsp baking soda
1/2 tsp baking powder
1/4 tsp salt
1 cup sugar
1/4 cup butter, room temp
1 egg
1 tsp vanilla extract
1 cup buttermilk
1 tbsp. unsweetened cocoa powder
3/4 tsp red food coloring

Preheat oven to 350 degrees and line muffin pan with baking cups.

In a medium bowl, whisk together dry ingredients. 

In a larger bowl, cream the butter and sugar until light and fluffy. Add the egg and vanilla and beat until mixed. 

Gradually mix in the dry ingredients, alternating with buttermilk, making sure to end with dry ingredients. Remove a cup of the batter to another bowl, and add cocoa and food coloring. Mix well until completely incorporated.

Pour a small amount of batter into each cup, then add a small amount of the red batter on top of that. Cups should be 3/4 full! Swirl with a knife or toothpick. Bake 18-20 minutes. Cool completely before icing.

Icing:
8 oz. cream cheese
7 oz. jar marshmallow fluff
1 1/2 tsp vanilla

Mix together until smooth. Pipe or spread onto each cupcake. Decorate with sprinkles. 


How in the world can a cupcake not cheer you up?...


Wednesday, January 26, 2011

Nutella. Cookies. Enough Said.

I know I can't be the only one that has to fight the temptation of grabbing a spoon and eating Nutella straight from the jar like its ice cream. Seriously, I look at it at least twice each day with that exact thought. Sometimes I give in and just go for a large finger dip. I could solve this problem by just simply not buying Nutella at the grocery store... but is that really possible? No. I've been meaning bake something with Nutella, and today was a perfect day for just that. I woke up this morning to a rainy, grey day and thought of nothing better to do until work other than bake. I checked some blogs online that I follow, and came across Nutella cookies. As indecisive as I am, I can tell you I didn't have to think twice, or once really.

These cookies are superstars in my book. Chocolate chips and Nutella isn't a combo that can be beat just any day of the week (actually, anything with Nutella can't be beat). And can you tell how BIG they are?! Yum yum.


Recipe:
(found on Erins Food Files)

Ingredients:
1/2 cup unsalted butter, room temp.
1/2 cup sugar
1/2 cup packed light brown sugar
1/2 cup Nutella
1 egg
1/2 tsp vanilla
1 1/2 cup flour
1 tsp. baking soda
1/4 tsp salt
1/3 - 1/2 cup chocolate chips

Preheat oven to 350 degrees.

Cream the butter for about a minute, then add the sugars. Beat on high until fluffy. Add egg and vanilla and mix on low.

In a separate bowl, whisk together flour, baking soda, salt. Add the dry ingredients to the wet. Combine until smooth and all of the dry ingredients are incorporated. Add chocolate chips.

Use an ice cream scoop to shape balls and place on greased cookie sheet. Bake for about 7-8 minutes. The cookies will spread a lot, so if you do not want a large, flat cookie place the dough in the fridge for about 10 minutes before forming balls. 

Cool on a wire rack, but I strongly suggest eating warm from the oven :). 


Thursday, January 20, 2011

I Love Ice Cream!

I don't really need to explain myself here, ice cream is my weakness. I don't have to be in the mood for ice cream, I'll eat it whenever, wherever. Particularly during the summertime, ice cream becomes a 4th meal in my day. I'm actually smiling while writing this because that's how much I love ice cream. I think it was meant to be when I moved back home and frozen yogurt bars popped up left and right at every major shopping center. We now have like, 7 in Greensboro. I'll thankfully never have to worry about a shortage there!

Earlier I mentioned the wonderful KitchenAid stand mixer that my wonderful boyfriend got for my birthday. And I believe I also mentioned that my mother got me an ice cream attachment to go along with it...!!! Yes, I can make my own now :). 

I was soo ready to make some creamy goodness on my birthday, so I read the manual which said to let the bowl freeze for at least 15 hours before using. I put the thing in the freezer, and checked on it a little later and it was cold! I thought it was frozen enough, but apparently 15 hours means 15 hours! I've always needed to work a little on that thing called patience...

Anyways, it all worked out and I got my homemade ice cream on the next try. 

My two most recent ice cream adventures were Peppermint (for the Holidays) and Strawberry Cheesecake ('cause its gooood). 

Both recipes were inspired by Cooking Light. 


Ingredients:

2 1/2 cups 2% milk
2 large egg yolks
2 teaspoons vanilla extract
1 can (14 oz) fat-free sweetened condensed milk
2/3 cup crushed peppermint candies

Combine 1 1/4 cups milk and egg yolks in a saucepan over medium heat. Cook until slightly thick, about 8 minutes, stirring constantly. Cool this mixture slightly.

Combine egg mixture, 1 1/4 cups milk, vanilla, and sweetened condensed milk in a large bowl. Cover and chill. Stir in the crushed peppermint candies, then pour the mixture into the freezer of an ice cream maker, and freeze according instructions. Move the ice cream from the ice cream freezer to a container and freeze until firm.


Ingredients:


2 cups granulated sugar (1 1/2 if you don't like it too sweet)
3/4 cup (6 oz) reduced fat cream cheese
4 large egg yolks
3 cups 2% milk
1 cup half-and-half (I used fat free)
3 cups strawberries chopped (blueberries in original recipe, I used frozen strawberries)
1/4 cup powdered sugar
1/4 cup water
1/2 -3/4 cup graham cracker crumbs

Combine sugar, cream cheese, and egg yolks in a bowl and beat well until smooth. In a saucepan, combine milk and half-and-half and bring to a boil. Remove from the heat, and pour half of the mixture into the egg mixture. Stir well and pour back into milk mixture and cook on medium-low for about 5 minutes. Cool this mixture completely either in the fridge or in a ice-filled pan.

In another saucepan, combine berries, water, and powdered sugar and heat until it begins to boil. Reduce the heat then allow the mixture to thicken while stirring constantly, about 8-10 minutes. Let this mixture cool completely, then pour into the milk/cream cheese mixture. Add to the ice cream freezer bowl and freeze according to manufacturers directions. The last 15 minutes is when I added the graham cracker crumbs. Store the ice cream in a container in the freezer. After dinner (and lunch), scoop out a bowl and drizzle with caramel sauce :).


What a coincidence they both happen to be PINK ice cream, just in time for Valentine's Day coming up ;).


Wednesday, January 19, 2011

Banana Oatmeal Muffins with Peanut Butter Glaze


I tend to think about the next meal, either before or during the current one, you follow? So that's where I began to make these muffins last night, thinking about how much I would enjoy one for breakfast. I love my breakfast, but believe me, I definitely get caught in the breakfast routine rut. These were a nice change, for a day or two.


They are healthy, low fat and low calorie, so I thought it was only necessary to drizzle them with a sweet peanut butter glaze.

Ingredients:

1 cup oats
1 cup whole wheat flour
1/2 cup all-purpose flour
2 tbsp. ground flax
2 tbsp. finely crushed Fiber One Original cereal
2 tsp. baking soda
2 tsp. cinnamon
1/4 tsp. salt
1 cup mashed banana (about 2 bananas)
1/2 cup yogurt (Lowfat Greek)
1/2 cup canola oil
1 egg

Glaze: (measurements may vary)
About 3/4 cup powdered sugar
2 tbsp. creamy peanut butter
1 tbsp. milk

Preheat oven to 350 degrees. Line muffin pan with baking cups (either regular or mini).

Mix together all the dry ingredients (Oats through salt). Whisk together. Mix together Banana, yogurt, oil, and egg. Add this mixture to the dry ingredients and mix until moist and well combined. Drop spoonfuls into prepared baking cups and bake for 18-20 minutes (regular size). If making mini muffins, bake 10-12 minutes.

Let the muffins cool on a rack, and mix together the glaze. Microwave for about 20 seconds, and let cool slightly. Drizzle over muffins.


Monday, January 17, 2011

Banana Bars with Cinnamon Chips

To be honest, I never knew cinnamon chips existed. For all I do know, they've been around as long as I have but I've just never had the pleasure of trying them! Until now...

I stopped by the grocery store last week after work, and happened to spot Hershey's cinnamon chips in a clearance cart! I was pumped, cinnamon chips exist AND they're on sale. I grabbed a few bags, headed home, and got my recipe search on. Then I remembered that I've saved a bazillion recipes with the intention of making them at some point, one of them from Erin's Food Files involving cinnamon chips! That's one off the list... here we go!


Ingredients:

6 tbsp. butter
2/3 cup brown sugar
1 egg
1 cup mashed bananas
1/2 cup all-purpose flour
1/2 cup whole wheat flour
1/2 teaspoon baking soda
1/2 teaspoon vanilla
1 cup cinnamon chips
1/2 teaspoon cinnamon


Preheat oven to 350 degrees. Grease a 9x9 inch pan.

Cream butter, add sugar and egg, beat. Stir in vanilla and banana. In another bowl combine all the dry ingredients. Add dry ingredient mixture to banana mixture, then stir in cinnamon chips. (You could also add walnuts). 

Bake for 25 minutes, remove and let cool completely before cutting. 

Apparently they pass for a breakfast bar as well. At least for my brother they did. Yep, we are related after all... 


Sunday, January 16, 2011

Chicken Avocado Napoleon Sandwiches


My friend, and former teammate, Cindel and I both share a love for cooking and trying new recipes. We used to get together with some of our other teammates while in school and cook dinners. That was our escapism from the crazy life of a student-athlete. She still lives in Raleigh, but we keep in touch and still share recipes we find with each other. So this recipe post comes from Cindel, who recommended Giada's Chicken and Avocado Napoleon! It's simple but still delicious, and a nice change from a traditional sandwich.

(Makes 4 servings)
Ingredients:
  • 2 (9x10 inch) frozen puff pastry sheets, thawed and cut into 12 3x5 inch rectangles
  • 4 chicken breasts, cooked and sliced thin
  • 3 tbsp. reduced fat mayonnaise
  • 1/4 teaspoon cayenne pepper
  • Avocado, sliced into thin pieces
  • 2 cups baby spinach leaves

Preheat oven to 400 degrees F, and place a rack on the lower 1/3 of the oven. Line 2 baking sheets with parchment paper.

Place puff pastry rectangles on the prepared baking sheets and use a fork to prick the tops of the pastry. Cover with parchment paper, and place another baking sheet on top (this is important so the puff pastry stays thin!). Bake for about 25 minutes until they are golden.

While cooling, mix mayonnaise and cayenne pepper in a small bowl.

Once they have cooled, place 4 of the puff pastry rectangles onto a surface to prepare. Place 3 thin slices of chicken on each, then about 1/4 cup of the spinach on each, followed by a couple thin avocado slices. Spread about a teaspoon of the mayonnaise on the bottom of 4 more puff pastry rectangles and place on top of the prepared ones. Repeat this layer one more time and finish with a pastry on top.

I loved the puff pastry and am imagining the possibilities to create a sandwich using them!


Saturday, January 15, 2011

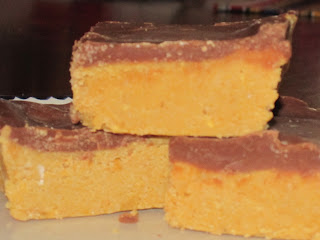
PB Chocolate Bars

I love goodies that take so little effort and time to whip up. These are dangerously good... They will not last long. Fact.


I intended to make these for Chris, my boyfriend, when he was coming up one night from Raleigh. He loves anything chocolate + peanut butter (but who doesn't...). After I made them, I realized it was a lost cause for him because he had been sick the whole week with some stomach bug. I should have thought of that before I made them, right? These bars proved me wrong, he had no problem eating them, what stomach bug?

Sick or not, these sweet little bars cannot be passed up...


You can't even tell there are yummy graham cracker crumbs in the peanut butter layer :).

(Recipe from Brown Eyed Baker)

  • 1/2 cup unsalted butter
  • 1 3/4 cup powdered sugar
  • 1 cup peanut butter
  • 3/4 cup graham cracker crumbs
  • 1/4 cup unsalted butter
  • 1/2 cup milk chocolate chips (could use semi-sweet, dark, or white!)

Line an 8x8 inch pan with aluminum foil leaving an overhang around the edges. 

Peanut Butter Layer:
Over low heat, melt 1/2 cup butter in medium saucepan. Remove from heat once melted, and add powdered sugar, stirring until smooth. Stir in peanut butter and graham cracker crumbs until it is all combined. Spread this mixture into the pan.

Chocolate Layer:
Clean out the saucepan, then melt the 1/4 cup butter. Add the chocolate and stir until almost melted, but still a few chocolate pieces. Remove from heat and stir until completely melted and smooth. Pour this mixture over the Peanut butter and smooth out the top. 

Refrigerate until set. I would recommend close to an hour before it is completely set. Remove the bars from the pan by using the aluminum foil to lift. Cut the bars into the desired size and remember to store in an airtight container in the refrigerator!